MiniBee Revision A
This revision was only distributed to those who were somehow involved in the project in 2009/2010. The overview of the board is given here for historical reference.
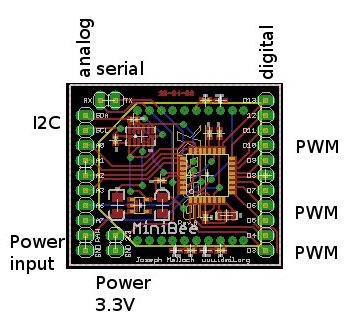
- 8 analog inputs (left side): A4 (SDA), A5 (SCL), A0, A1, A2, A3, A6, A7
- 11 digital inputs or outputs (right side): D3 to D13
- PWM (“analog”) output, (right side), D3, D5, D6, D9, D10, D11
- I2C communication, (left side top): SDA, SCL
- Serial I/O (top left): RX, TX
- Power input (between 3.3V and 5V) (left side bottom): RAW, GND
- Regulated power output (left side bottom inside): 3.3V, GND
- green pcb
Pin out
  RX -  TX - D13
 SDA -     - D12
 SCL -     - D11
  A0 -     - D10
  A1 -     -  D9
  A2 -     -  D8
  A3 -     -  D7
  A6 -     -  D6
  A7 -     -  D5
Vraw - 3v3 -  D4
 GND - GND -  D3
LEDs
- Next to D13 : yellow for network association
- Next to D3 : red for RSSI, green for XBee radio on
Technical documents
Board layout and schematic are available here: design files for Eagle on github
Programming firmware
For programming the firmware, use the board definition: Sense/Stage MiniBee revA (3.3V, 8MHz) w/ Atmega168
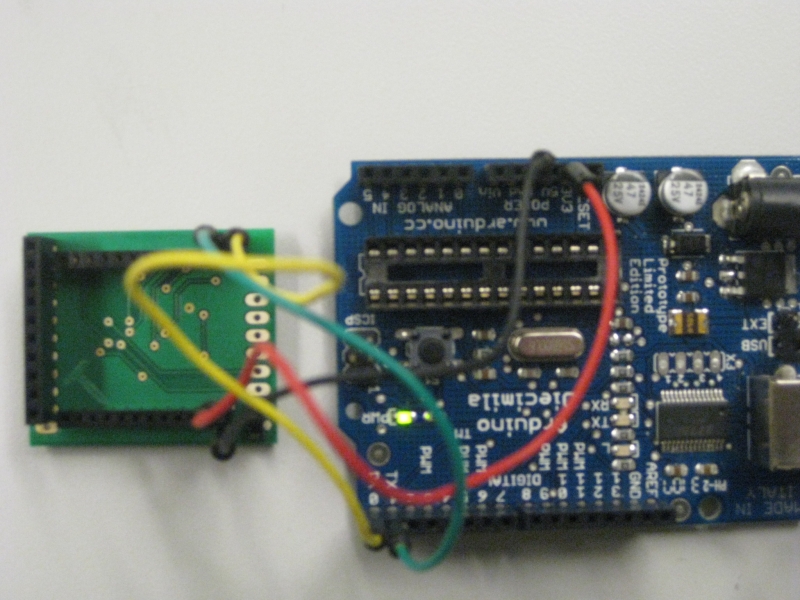 Programming minibee revision A using an Arduino board
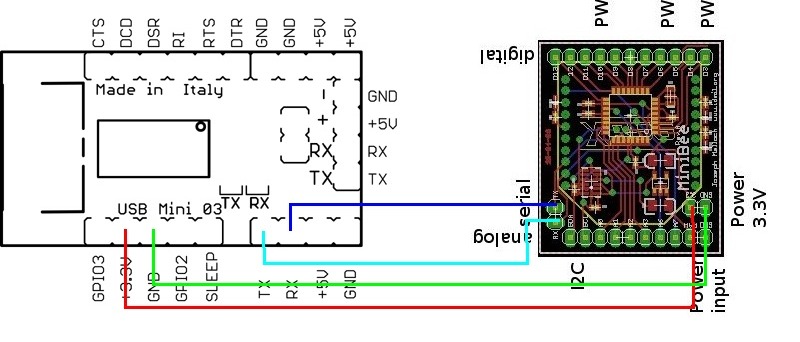 Programming minibee revision A using a USB adapter board
Programming the bootloader
Before the firmware can be uploaded to the board, a bootloader needs to be present on the board. This section describes how the bootloader can be programmed onto the board. This only needs to be done once; depending on how you obtained your board, the bootloader may already have been programmed onto the board.
Soldering:
- 2 pin female header to RX/TX
- 2 pin female header to 3.3V / GND
- female headers to pin D11, D12, D13
You need:
- A programmer board to fit the board on
- A USB adapter
- AVR mkII – avr programmer
While programming the bootloader, you must hold a wire to the reset pin. This is to work around an omission in the revA design.
Use the Arduino programming software:
- Set the board type to
Sense/Stage MiniBee revA (3.3V, 8MHz) w/ Atmega168 - Choose
Program BootloaderwithAVR ISP mkII - On Ubuntu Linux you must run the Arduino software as root in order to do this
| page created on: | last changed on: |
|---|---|
| 6 February 2017 | 4 September 2019 |