The MiniBee element
Then there are elements for each MiniBee you have:
<minibee id="1" revision="F" serial="0013A200406A697E" libversion="8" caps="7" configuration="1">
</minibee>
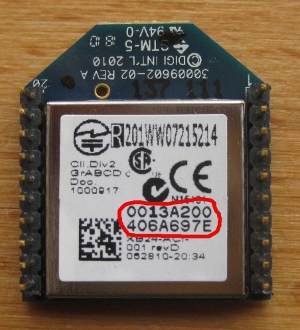
So the ID, the revision of the board, the serial number of its XBee (see back side of XBee as in the image below; but see also below as pydonhive will find the serial number automatically), the library version and the capabilities are defined. The elements you want to change are the id, and the serial number.

Then you define the configuration that is used by this minibee by a number, which refers to a configuration element.
Several MiniBees can be defined that have the same configuration, e.g. minibees 1, 2 and 3 have configuration no. 1, minibees 4 and 5 have configuration no. 2, and so on.
Automatically generating configurations
You do not need to look up and type in the serial numbers of your XBees, if start from an example configuration file, and start communicating with an unknown MiniBee, pydonhive will automatically generate a new xml file (with a name like: newconfig_2013_Mar_18_18-16-38.xml, containing the basic details of the MiniBee but with a configuration ID of “-1″. Simply change the configuration ID to one that is defined in the file.
<minibee caps="7" configuration="-1" id="3" libversion="8" name="" revision="F" serial="0013A200406A697E">
<!--the id given inside the minibee tag is the unique id or number of the minibee-->
<!--the configutaion inside the minibee tag is the unique id of the configuration that is used. It has to match one of the configuration id's that are defined in this file.-->
<!--This minibee has no configuration yet! Change it to use one of the configurations in this file.-->
</minibee>
Instead of editing the file, you can also assign a configuration via OSC.
| page created on: | last changed on: |
|---|---|
| 6 February 2017 | 4 September 2019 |
