Contributing to the documentation
how to contribute to the documentation
| general | > | contributing | > | tags: documentation |
There are several ways to contribute to the documentation:
- EASY: Ask questions and make suggestions on the forum
- EASY: Submit an issue on github
- PRETTY EASY: Editing documentation pages online with github
- ADVANCED: Editing offline and previewing on your computer
Ask questions and make suggestions on the forum
The forum is the place where all questions about the Sense/Stage system can be asked. So if you cannot figure out how to do something, you can ask the question there, and one of the other people on the forum will respond to your question and a discussion will start.
As users ask questions, we will find out how the documentation can be improved, and the forum builds up a repository of questions and answers that can be referred back to in the future.
If there is a particular documentation page that you want to discuss, you can name the topic accordingly and tag the topic as Documentation. For example: Suggestions for the Getting Started with Sense/Stage documentation. Then in the post itself you can make the suggestions you have for improving the documentation page. For example you can propose a text that you would like to see on the page and explain where on the page there is a mistake (and if possible how to improve it).
Some discussion on the forum will follow and either someone else will make the suggested changes to the documentation page, or file an issue on github to remember to make the changes at a later point in time.
Submit an issue
We host our documentation pages on github. By signing up with github, you can file issues that you find with the documentation.
- Sign up at github. Just sign up for the free account. Do not forget to verify your account.
- Go to the Sense/Stage documentation pages on github
- Click on the Issues tab.
- Click the green button on the top right saying New issue
- Give a clear title to the issue, for example: make a reference to the shop on the getting started page
- Describe what you would like to see changed in the documentation page. For example you can propose a text that you would like to see on the page and explain where on the page there is a mistake (and if possible how to improve it).
- After you submit the issue, other people can comment on the proposed change. One of the Sense/Stage team members will pick the issue up and make the suggested improvement to the documentation page. And close the issue once it is resolved.
Creating your own copy of the documentation pages on github
We host our documentation pages on github. By signing up with github, you can edit the documentation online and send us a message to update the webpage.
- Sign up at github. Just sign up for the free account. Do not forget to verify your account.
- Go to the Sense/Stage documentation pages on github
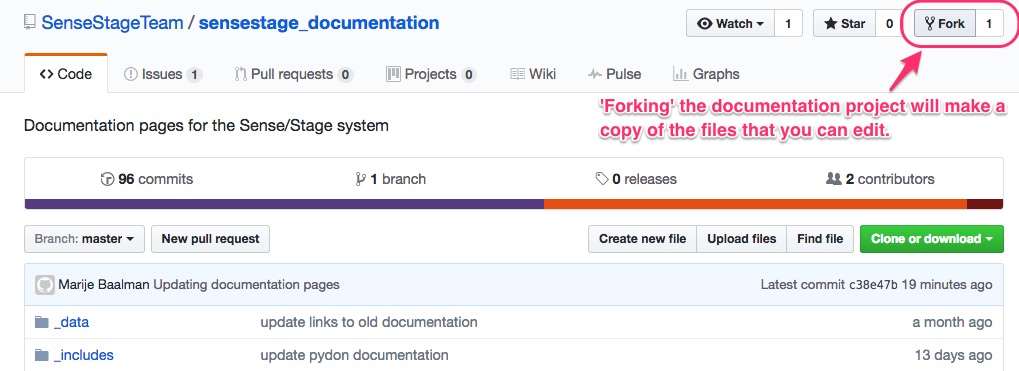
- Fork the repository. There is a button at the top right side, saying Fork. This will create a copy of the documentation files into your account on github.
- Navigate to the file you want to change the documentation of.
Forking in detail
The process of making edits to a project on github is simple, but the workflow can be a little confusing if you’ve never encountered it before. In order to make changes to a project you need to first make your own copy of the project called a “fork”. You’re free to make whatever edits you want to the files in your fork without worrying about accidentally messing something up. Once you’ve made your edits in your fork, you send these changes to the Sense Stage team for review. When you send changes for review it’s called a “pull request”, because you’re asking us to pull your changes into the main project. Once you send us a pull request we’ll give it a quick check and then merge it into the main documentation as soon as we can.
Here’s the process in more detail:
-
Log into github and go to the sensestage_documentation file repository. Click on the “Fork” button in the upper right. This will give you your own copy of the documentation files for editing.

-
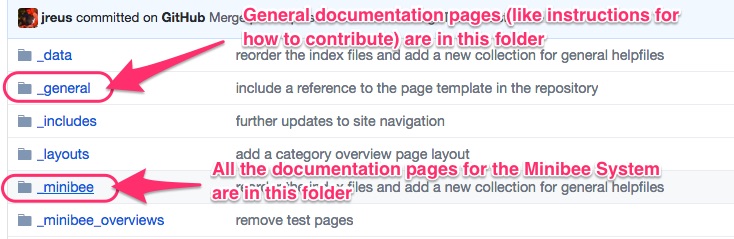
In your local fork, use the file navigation to go to the directory where the documentation file you want to edit is stored. For documentation of the Minibee System this is the _minibee directory.
-
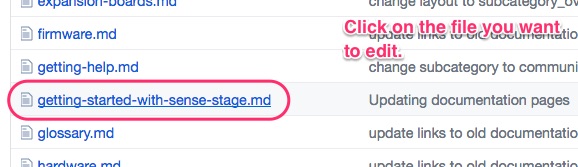
Inside that directory click on the file you want to edit.
-
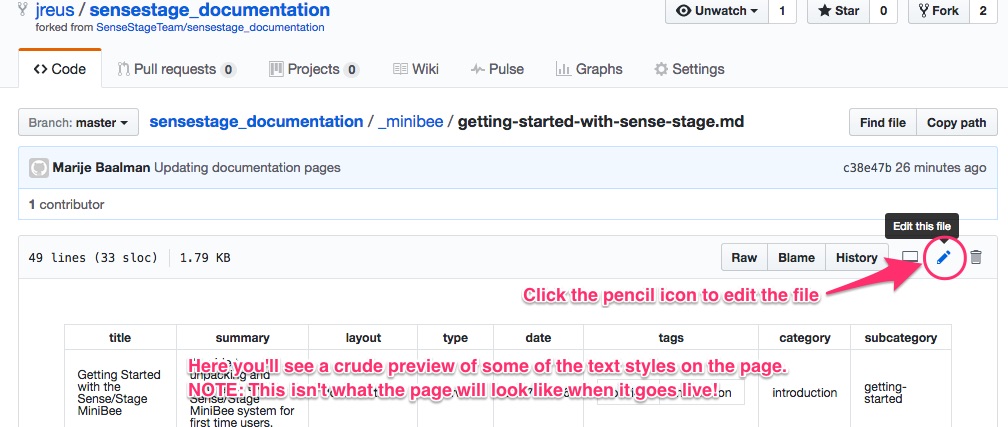
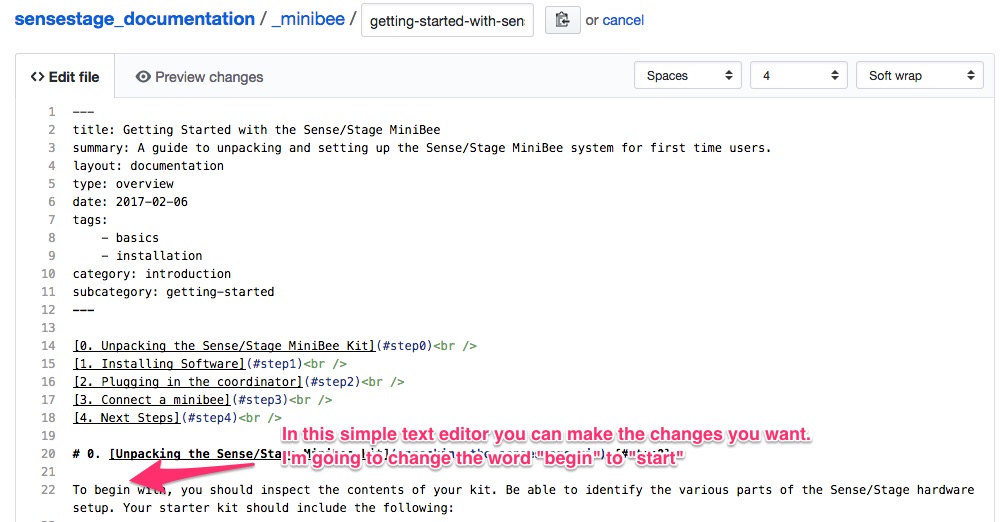
In the next screen, click the pencil icon in the upper right corner to edit the file. This will open up a simple text editor where you can go in and make the changes you want.
-
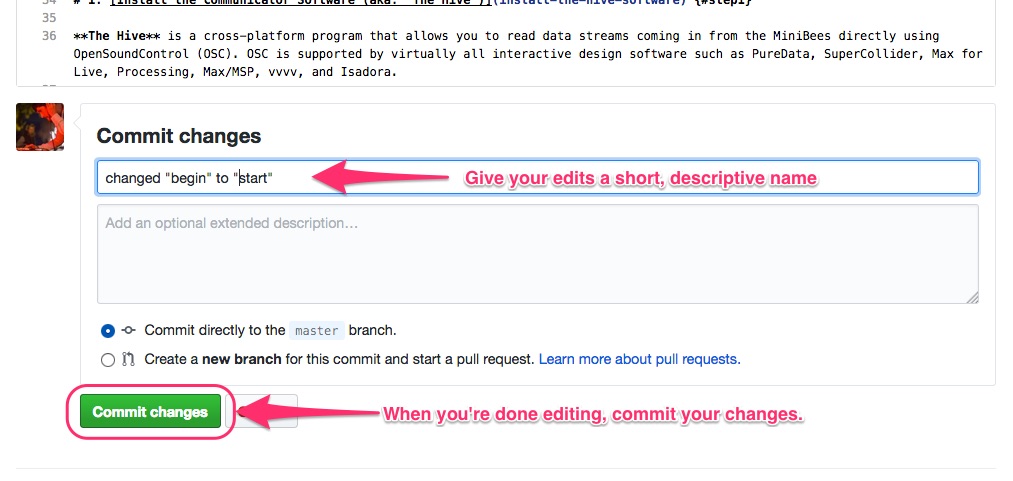
Once you’re done editing the file, scroll down to the “Commit changes” section. Enter a short description of the changes you made and click the green “Commit changes” button.
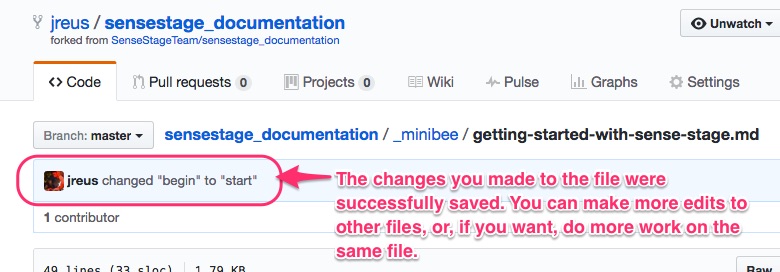
You’ll be brought back to the homepage of your fork and receive a little confirmation message with the description of changes you just made. At this point you can make changes to other files, make more changes to the same file, or.. if you’re all done, you should submit a Pull Request.
Submitting your edits to the Sense Stage team
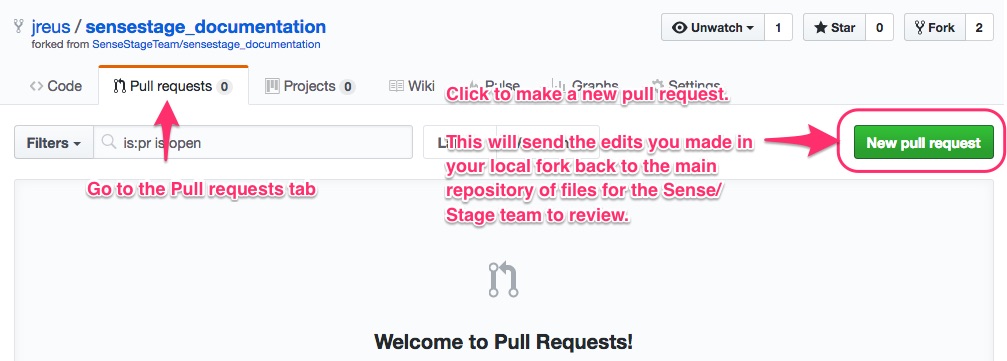
Once you’ve made a bunch of edits to your local fork you’ll want to send them to us so we can merge them into the main documentation files. To do this you need to submit a “Pull Request”.
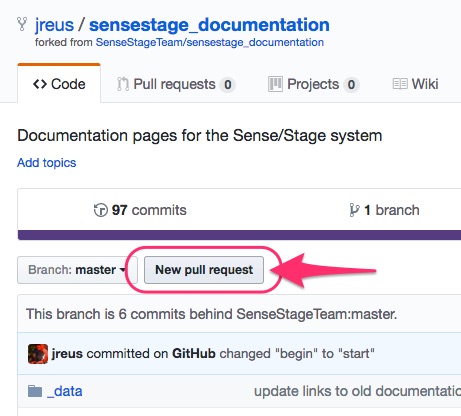
-
Go to the “Pull requests” tab of your local fork (the copy where you made your edits). Click on “New pull request”.
-
You’ll be taken to the main documentation repository page. Click on “Create pull request”.
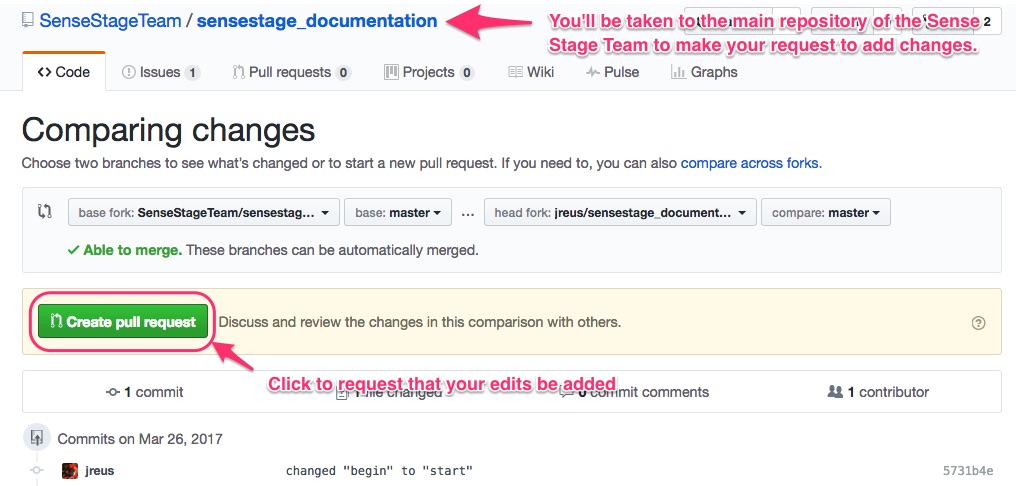
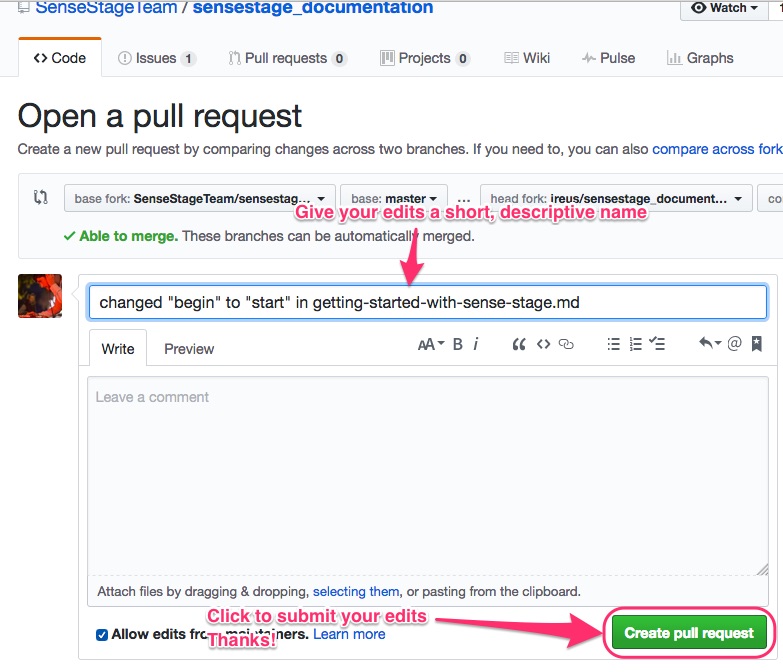
-
Give your submission a short but descriptive title and click on the “Create pull request” button to send it to us. Thanks!
Layout of the repository
The important folders where you will want to put files or change files are:
_general: this is the documentation for general topics, like how to contribute and find help_minibee: this is the documentation for everything around the MiniBee systemimg: this is where images for the documentation go
Writing your contribution
Edit a page
To find the page that you want to edit, look at the URL of the documentation page. For example if you want to improve the Getting Started page, the URL is https://docs.sensestage.eu/minibee/getting-started-with-sense-stage.html. You can then find the source file in the folder _minibee (mirroring the /minibee in the URL) with the filename getting-started-with-sense-stage.md. Click on the file name. You will see a rendered version of the documentation page. If you click on the Edit button you will be able to edit the documentation page.
See the this page for the formatting of the text
Make a new page
- Go to the directory where you want to make the file. For example
_minibee - Click on Create new file on the top right.
- The name of the page should match the title of the page you want to make. Except with
-instead of spaces or other signs. So “Getting started with Sense/Stage” should have the file name `getting-started-with-sense-stage.md’ - Fill in the metadata of the page
- Write the page.
- Commit the change
- Inform us about the change
See this page for the formatting of the text
Upload files
Perhaps you have written a page offline, or you want to add images to the documentation
- Go to the directory where you want to make the file. For example
_minibeeorimg - Click on Upload files on the top right
- Drag and drop files or select choose your files
- Commit the change
- Inform us about the change
For images, please make the filename of the image as descriptive as possible. So instead of image1.jpg use connecting-a-pressure-sensor-to-a-minibee.jpg if the image depicts how to connect a pressure sensor to a minibee. Also, don’t use spaces in the file names. So instead of connecting a pressure sensor to a minibee.jpg use connecting-a-pressure-sensor-to-a-minibee.jpg
Seeing your contribution online
You will not see your contribution in the online documentation directly. After you have informed us (made your pull request) as described below, we will review the changes that you have made, merge your proposed changes with the official copy and render the result to html. Then we will upload the result to the website. We will let you know that we have done so by commenting on the pull request.
You can already get a preview on github itself, if the document is not in the edit mode. In this preview you will see the basic formatting of the page (italic/bold text, headers, links, embedded images), so you can already check if you the contribution is as intended. However, the final result will look slightly different.
Submitting the update
Committing the change
Once you have edited the file, you can commit the changes at the bottom of the page. You can give a description of what you changed in the documentation page; this is a reference for the future to understand the history of the changes to the document over time.
Just commit to your master branch.
Informing us about the changes you made
To tell us about the changes you made, you have to make a “Pull request”.
- Go to the tab “Pull Requests”
- Click the green button “Create a pull request”
- Github will give an overview of the changes you made.
- You can give a description of all the changes you made.
- And then click “Create pull request”.
We will then be notified about the changes, review them and merge them into the documentation. And update the website.
Congratulations! You are now a contributor to the Sense/Stage project!
Go back to your copy of the repository
- Go to your profile
- Go to your repositories
- And go the
sensestage_documentationrepository
Syncing your local copy of the repository with the latest version
At some point you might notice that the files in the main SenseStageTeam repository have been updated, while your local copy remains outdated. In order to get the latest version of the documentation files you need to do a pull request that copies over all the new files into your local fork.

-
Click the “New Pull Request” button.
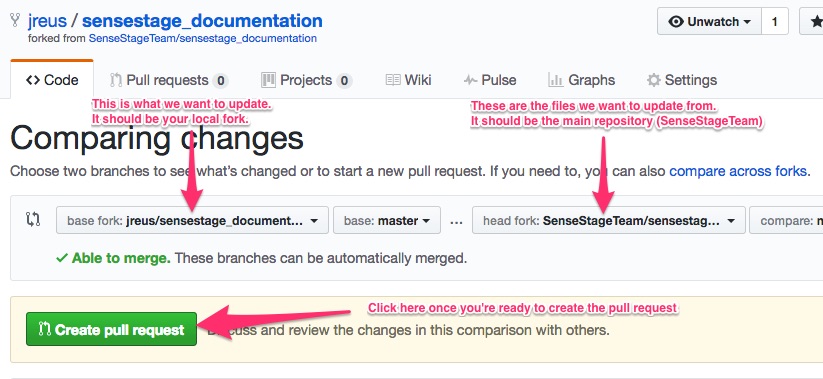
 This will take you to the Comparing Changes screen.. which should look something like this.
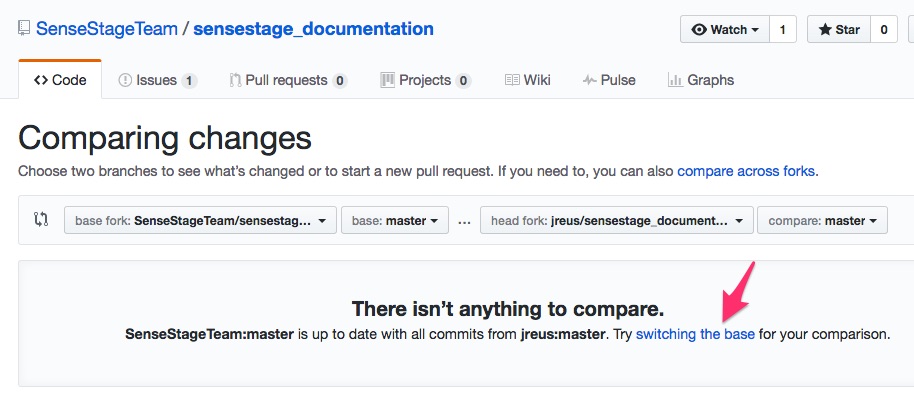
-
If the option to “Try switching the base for your comparison” is there, click that If not, switch the bases manually using the dropdown menus. Set them up so that your local fork is on the left, and the original is on the right.
-
Click the “Create pull request” button. If you want you can also scroll down and see what’s different between your files and the ones in the SenseStageTeam repository.
-
Give it a title like “updating my local copy”.
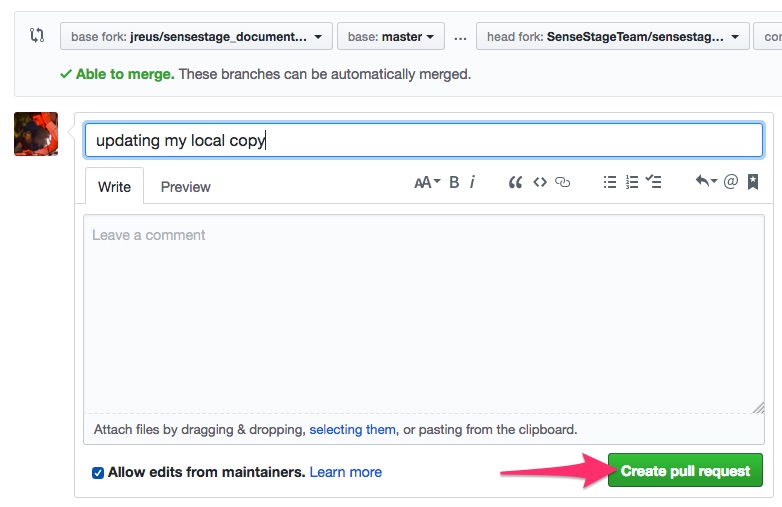
- Click the “Create Pull Request” button.
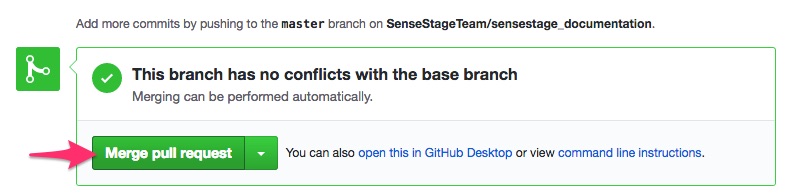
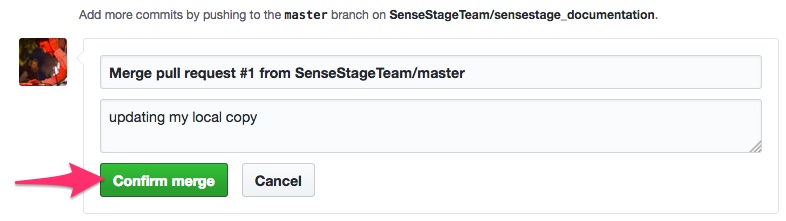
- Click the “Merge pull request” button, and after that “Confirm Merge”. You’re up to date!
Advanced methods
The documentation pages are rendered with Jekyll. You can set up Jekyll on your own system and preview the pages in your browser.
Setting up Jekyll
Jekyll itself is written in Ruby. So you need to get Ruby first.
The easies way is to use the Ruby Version Manager (RVM) first. Follow the instruction on the RVM website on how to install. Then you install the right version of Ruby (v2.1.2) and bundler like this:
rvm install 2.1.2
rvm use 2.1.2
gem install bundler
bundle install
Cloning the git repository on your machine
- On your copy of the github repository, click Clone or download
- Copy the link given there
- Open a terminal
- Type
git clone(with a space at the end) - Past the link you just copied on the command line after the space
- Press enter
- You may be asked for your password to your github account
- Cloning of the repository on your local machine will start
- A folder named
sensestage_documentationwill be created
Run Jekyll locally
Now you can start Jekyll on your local machine:
From sensestage_documentation folder:
cd sensestage_documentation
bundle exec jekyll serve
And now you can browse to the local URL: http://localhost:4000 and preview the changes.
Once done, you can stop the local hosting again by pressing CTRL-C in the terminal.
Jekyll References
Commit your changes
- Add and commit your local changes with git using the
git addandgit commitmethods - Push your changes to your github account:
git push origin master - Create a pull request so that we can merge your changes
Related pages:
| general | > | contributing | > | tags: documentation |
| page created on: | last changed on: |
|---|---|
| 26 March 2017 | 4 September 2019 |